What is this another post already!? I've been starting to get bored around the house during the day so I've been doing LOTS of research on outfits/bags/ ect for Civil War reenacting that R & I do. He's been doing it for a long time and when we were engaged I started tagging along. I enjoy hanging out with the guys and camping, not so much the wearing wool in the summer. We are with a unit out of the quad cities so most of our battles are in Illinois and eastern Iowa. We were lucky enough to go to Shiloh TN, for the 150th battle. I actually got hives from something and was pretty miserable by the end of the week but it was still a good time.
I dress both parts, wearing dresses and as a soldier, depending on my mood and the weather and what the unit is doing. I don't have a musket yet so that limits me a little. We're an artillery unit though so most of our reenactments we shoot a cannon. I'll post another blog later about the details of a reenactment so this isn't super long. On to what this post is about!
I have been needing something to carry my "farby" (modern day) stuff and other clothes for the weekend so I did a little research but mostly used what I had seen someone else carry to make a bag that's more period correct than my backpack I have been using. Mine is not totally period correct but good enough for me. I'm not a "thread counter" or a hard core reenactor by any means. I don't know if I'll ever be there! This is the style of bag I was going for.
 |
| Image from http://www.thecarpetbagger.com/category/Knitting-6 |
It's a pretty simple design. I also used that site for the size. 18in. tall x 22in. wide x 8in. thick. It's made out of upholstery style fabric, why it's called a carpet bag.


I found some really cute fabric perfect for this project and got some muslin for other projects and to use as the liner. I started by drawing out my pattern and making a quick prototype.
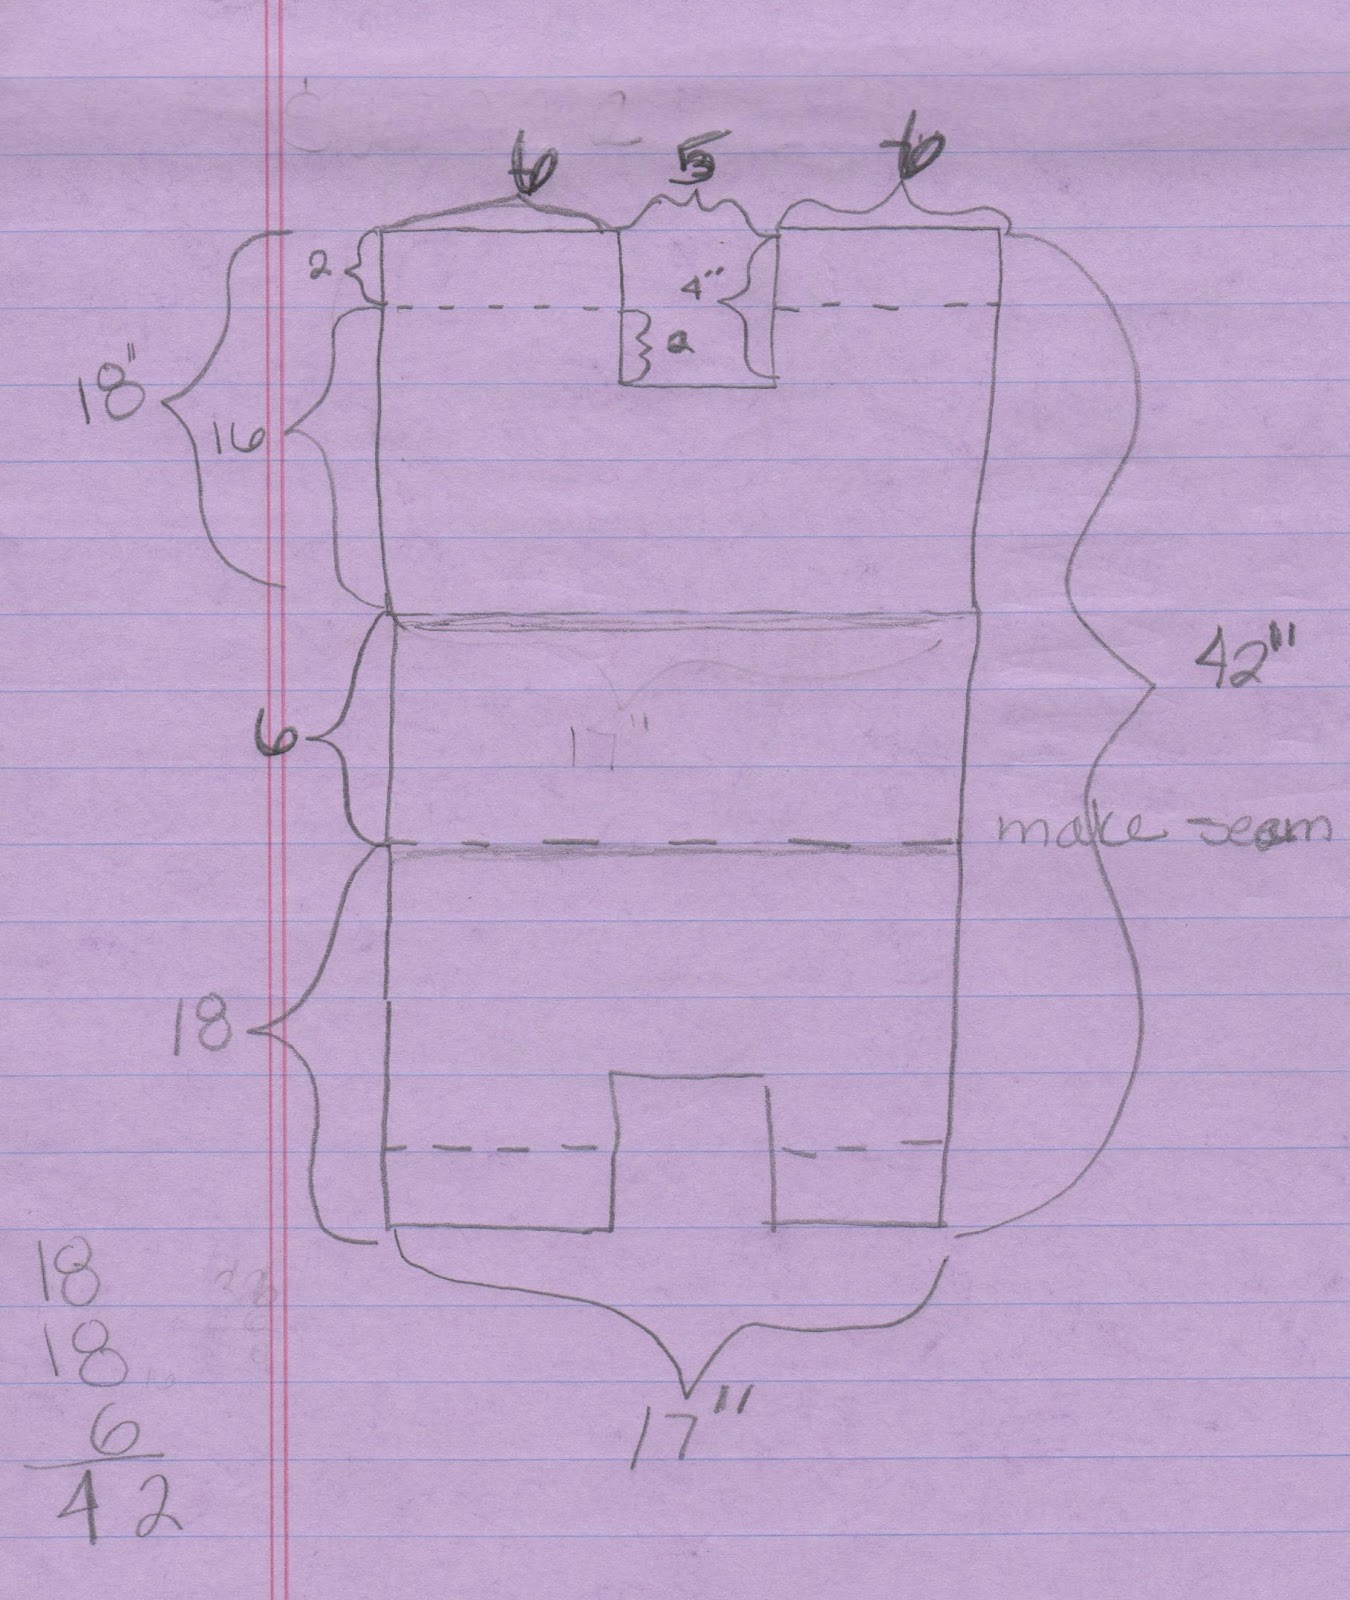 |
| 1st plan, before reading the bigger size! |
~1 yard upholstery fabric ($5) and you'll have left overs for some other project!
Same amount of muslin. (It was about $7 for one yd)
7/8 inch dowel (less than $1)
Thread
Button
I cut the muslin and outer fabric at the same time to make it easier. My total big piece I cut 45 inches.
First cut the big main piece and where you'll hold the dowel out. Then (optional) sew pockets on to the right side of the muslin liner. (ok muslin doesn't really have a right/wrong side but when you sew pockets on it will). I sewed one on both sides so that smaller things like chapstick, cell phone ect don't get lost in the bottom. To do this, you just need to use the outer fabric. No real reason for it to have a liner. Press each edge over about 1/4-1/2 inch. Then sew one side to keep this, this will the the top side. It isn't necessary to sew all 4 sides because they'll stay when you sew it to the muslin. I zigzaged the other edges on to make sure I caught the folded over part.
 After the pockets are sewn on, sew right sides together leaving a space to turn it right side out. I left the space right under where the handle goes because I wanted to put a flap to close it there anyway.
 Then I sewed some seams on what would be the sides of the bottom. This helps it keep it's shape. Measure from the top down and pin so you know where to fold. Then fold it over and press it lightly. Sew about a 1/4 inch from this fold straight across. (This is where you want to make sure you measure twice sew once, or you'll be come friends with your seam ripper. :) Also, quick tip if you do have rip out a seam, it happens to everyone but the easiest way to get rid of all those little threads--- lint roller. Roll it over a few times and they all get stuck to it, so much easier!)
Now it's time to start sewing on the side pieces. Make sure you measure from you're actual piece rather than just use the numbers because chances are they won't be the same from the plan; measure from the part under where the handle will go to the bottom seam. Sew right sides of liner and outer together leaving a side to turn it out. I left the bottom because no one will see it. Start by pinning and sewing the bottom edge also, that way you can gauge if you're too long how much to leave hang. Carefully stitch this on. Then pin and sew the sides one at a time. (This is about the time the bobbin runs out and you get really frustrated because none of your extra bobbins seem to work with the machine.)
Now turn the bag right side out and admire your handy work! So close to being done!
It's not time to make the "pockets" for the dowel handle. Fold the top four flaps down to make them even with the top edge. Does that make sense? On one sew the side and the bottom down, on the other on the same side you can only sew the side so you can slip the dowel in. Thinking about it now, you could also sew the bottom edge and slip the dowel in the side. Either way would work.
Now (Optional) is to make a flap to close
it. I used some scraps that were cut off. It was about 2inches wide and
maybe 6 inches long, 2 pieces of the outer fabric, no muslin. Sew right
sides together and turn out by the bottom flat side left open. I used
my button hole feature to sew one on the actual flap because I hadn't
ever used it and want to try it. Stick this in the opening left from
turning the bag right side out and top stitch it there. Sew the button on the opposite side.
Measure how long to make your dowel. Mine was a little shorter than I had originally planned. Cut to length and slip in the pockets you just made. Sew the open side shut. This can be a little tricky with the dowel in there, just make it to the out side of the machine and you should be in the clear.
Now I think we're done!

 Total cost is less than $10, much much cheaper than buying one, and I like this fabric better than most of what I've seen, even though it's not period correct or anything. I don't care, it works for me!
No comments:
Post a Comment